Containerize and Deploy Your ML Model in Python
February 20, 2022
By Khuyen Tran
Motivation
You have just built a machine learning model to predict which group a customer belongs to. The model seems to do a good job in segmenting your customers. You decide to give this model to your team members so that they can develop a web application on top of your model.
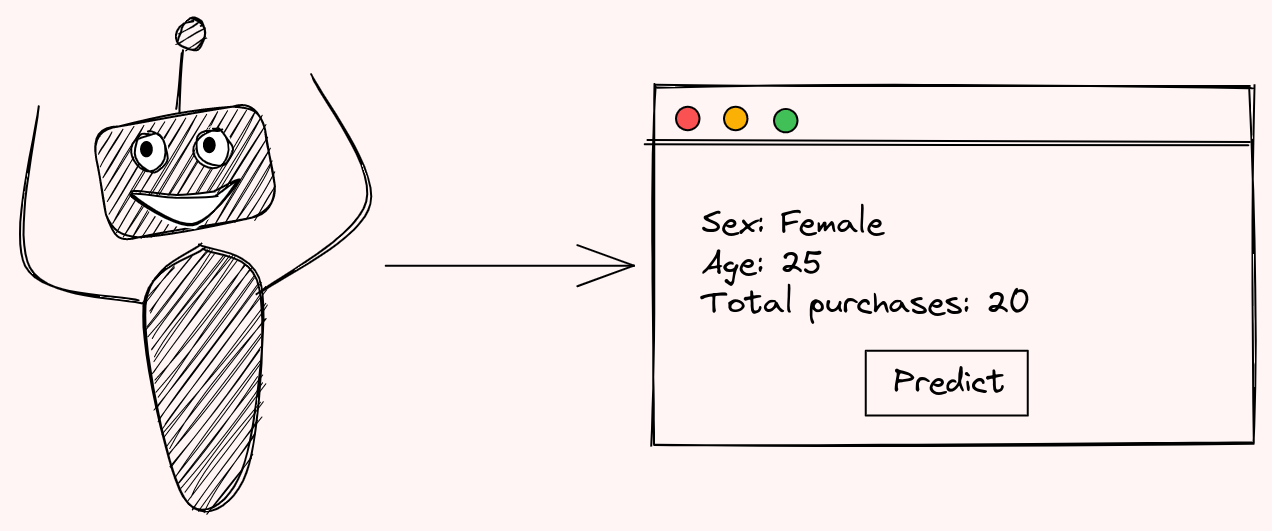
Wait, but how will you ship this model to your team members? Wouldn’t it be nice if your team members can use your model without setting up any environment or messing with your code? That is when BentoML comes in handy.
What is BentoML?
BentoML is a Python open-source library that enables users to create a machine learning-powered prediction service in minutes, which helps to bridge the gap between data science and DevOps.
To use the version of BentoML that will be used in this article, type:
pip install bentoml==1.0.0a3To understand how BentoML works, we will use BentoML to serve a model that segments new customers based on their personalities.
Process the Data
Start with downloading the Customer Personality Analysis dataset from Kaggle. Next, we will process the data.
Since we will use the StandardScaler and PCA to process the new data later, we will save these scikit-learn’s transformers in pickle files under the processors directory.
import pickle
import pandas as pd

from sklearn.decomposition import PCA
from sklearn.preprocessing import StandardScaler

# Scale
scaler = StandardScaler()
scaler.fit(df)
df = pd.DataFrame(scaler.transform(df), columns=df.columns)

# Reduce dimension
pca = PCA(n_components=3)
pca.fit(df)
pca_df = pd.DataFrame(pca.transform(df), columns=["col1", "col2", "col3"])

# Save processors
pickle.dump(scaler, open("processors/scaler.pkl", "wb"))
pickle.dump(scaler, open("processors/PCA.pkl", "wb"))
Find the full code to read and process the data here.
Save Models
Next, we will train theKMeans model on the processed dataset and save the model to BentoML’s local model store.
from sklearn.cluster import KMeans
import bentoml.sklearn

pca_df = ...

model = KMeans(n_clusters=4)
model.fit(pca_df)

bentoml.sklearn.save("customer_segmentation_kmeans", model)
After running the code above, the model will be saved under ~/bentoml/models/ . You can view all models that are stored locally by running:
$ bentoml models listNote that the model is versioned with a specific tag. If we save another model with the same name, you should see a different tag.
This is pretty nice since versioning the model will allow you to go back and forth between different models.
Find full code on training and saving the model here.
Create Services
Now that we have the model, let’s load the latest customer segmentation model and create a service with that model in bentoml_app_pandas.py:
import bentoml
import bentoml.sklearn
from bentoml.io import NumpyNdarray, PandasDataFrame

import pickle
import numpy as np
import pandas as pd

# Load model
classifier = bentoml.sklearn.load_runner("customer_segmentation_kmeans:latest")

# Create service with the model
service = bentoml.Service("customer_segmentation_kmeans", runners=[classifier])
After defining the service, we can use it to create an API function:
# Create an API function
@service.api(input=PandasDataFrame(), output=NumpyNdarray())
def predict(df: pd.DataFrame) -> np.ndarray:

    # Process data
    scaler = pickle.load(open("processors/scaler.pkl", "rb"))

    scaled_df = pd.DataFrame(scaler.transform(df), columns=df.columns)

    pca = pickle.load(open("processors/PCA.pkl", "rb"))
    processed = pd.DataFrame(
        pca.transform(scaled_df), columns=["col1", "col2", "col3"]
    )

    # Predict
    result = classifier.run(processed)
    return np.array(result)
The decorator @service.api declares that the function predict is an API, whose input is a PandasDataFrame and output is a NumpyNdarray .
Now let’s try out the service in debug mode by running bentoml serve . Since bentoml_app_pandas.py is under the src directory, we run:
$ bentoml serve src/bentoml_app_pandas.py:service --reloadOutput:
[01:52:13 PM] INFO     Starting development BentoServer from "src/bentoml_app_pandas.py:service"
[01:52:17 PM] INFO     Service imported from source: bentoml.Service(name="customer_segmentation_kmeans", import_str="src.bentoml_app_pandas:service",
                       working_dir="/home/khuyen/customer_segmentation")
[01:52:17 PM] INFO     Will watch for changes in these directories: ['/home/khuyen/customer_segmentation']                                                       config.py:342
              INFO     Uvicorn running on http://127.0.0.1:5000 (Press CTRL+C to quit)                                                                           config.py:564
              INFO     Started reloader process [605974] using statreload                                                                                     basereload.py:56
[01:52:21 PM] INFO     Started server process [606151]                                                                                                            server.py:75
              INFO     Waiting for application startup.                                                                                                               on.py:45
              INFO     Application startup complete.
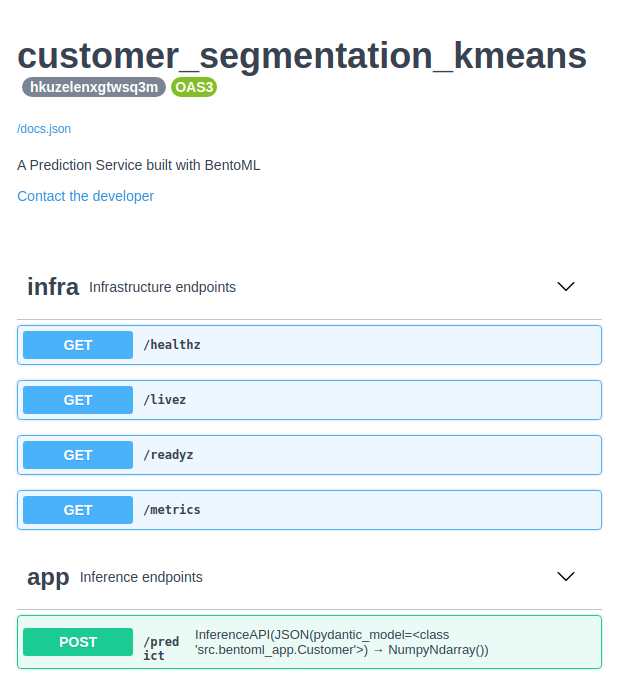
We can now interact with the API by going to http://127.0.0.1:5000 and clicking the “Try it out” button:
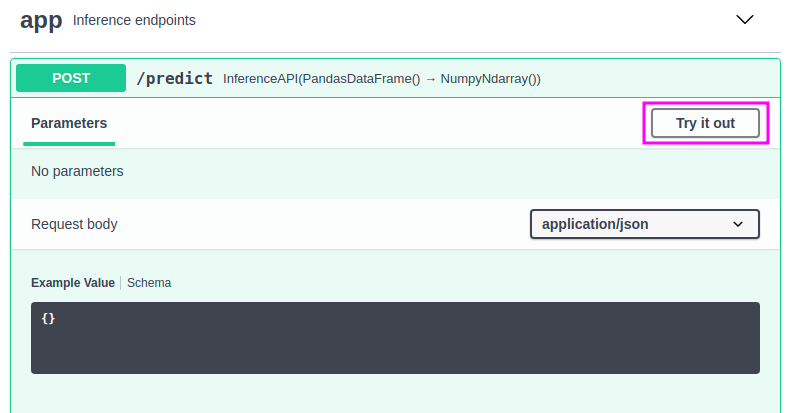
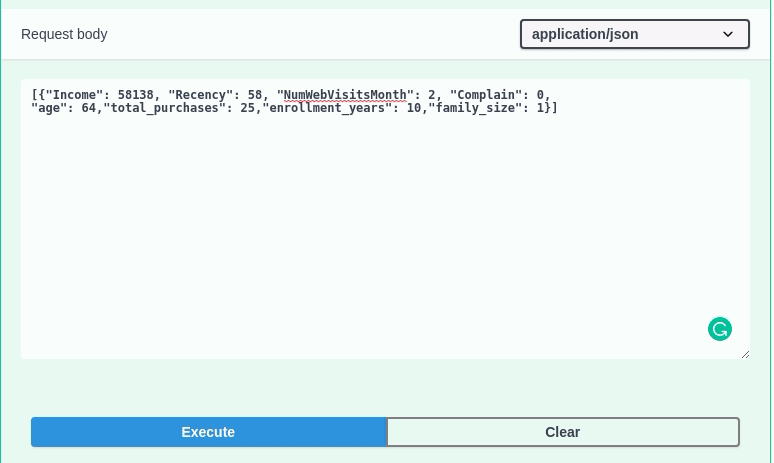
Insert the following value:
[{"Income": 58138, "Recency": 58, "NumWebVisitsMonth": 2, "Complain": 0,"age": 64,"total_purchases": 25,"enrollment_years": 10,"family_size": 1}]
… to the Request body should give you a value of 1 . This means that the model predicts that the customer with these characteristics belongs to cluster 1.
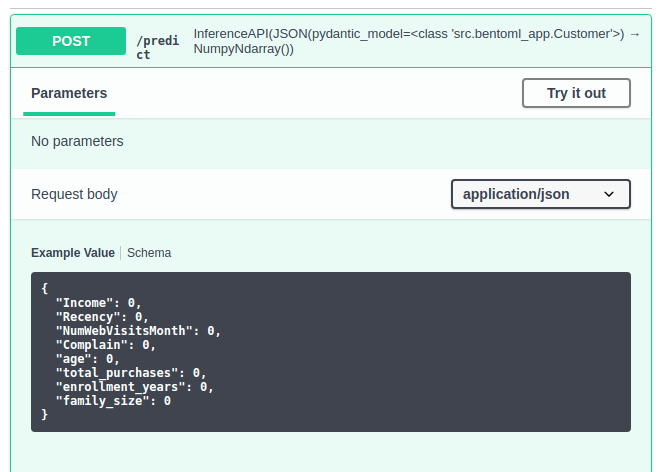
Create Data Model with pydantic
To make sure that users insert the correct values with the right data types into the API, we can use pydantic to create a custom data model:
from bentoml.io import JSON, NumpyNdarray
from pydantic import BaseModel

# Code to create service
...

# Create customer model
class Customer(BaseModel):

    Income: float = 58138
    Recency: int = 58
    NumWebVisitsMonth: int = 7
    Complain: int = 0
    age: int = 64
    total_purchases: int = 25
    enrollment_years: int = 10
    family_size: int = 1

# Create an API function
@service.api(input=JSON(pydantic_model=Customer), output=NumpyNdarray())
def predict(customer: Customer) -> np.ndarray:

    df = pd.DataFrame(customer.dict(), index=[0])

    # Code to process and predict data
    ...
Now you should see the default values under the Request body.
Find full code on creating the API here.
Build Bentos
After making sure that everything looks good, we can start putting the model, service, and dependencies into a bento.

To build Bentos, start with creating a file named bentofile.yaml in your project directory:
service: "src/bentoml_app.py:service"
include:
 - "src/bentoml_app.py"
 - "processors/*"
python:
  packages:
  - numpy==1.19.5
  - pandas==1.3.3
  - scikit-learn==1.0.2
  - pydantic==1.9.0
Details about the file above:
- The
includesection tells BentoML which files to include in a bento. In this file, we include bothbentoml_app.pyand all processors we saved earlier. - The
pythonsection tells BentoML what are Python packages the service depends on.
Now we are ready to build Bentos!
$ bentoml build
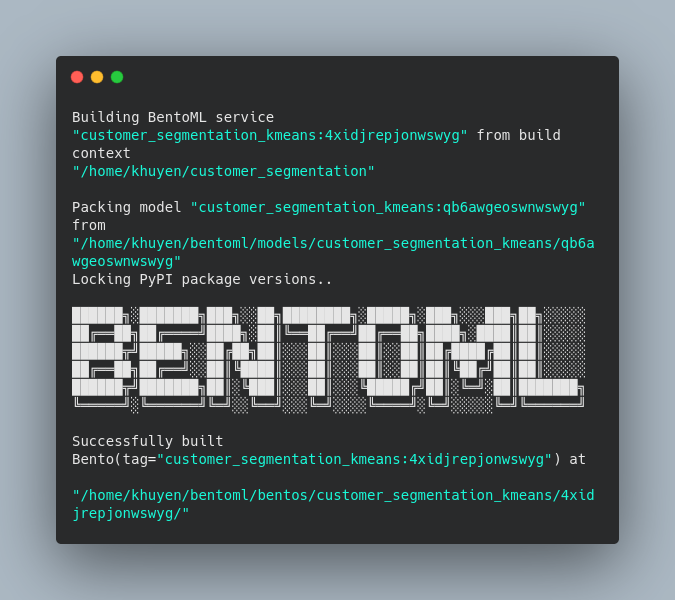
The Bentos built will be saved under the ~/bentoml/bentos/<model-name>/<tag> directory. The files in the directory should look similar to the below:
.
├── apis
│   └── openapi.yaml
├── bento.yaml
├── env
│   ├── conda
│   ├── docker
│   │   ├── Dockerfile
│   │   ├── entrypoint.sh
│   │   └── init.sh
│   └── python
│       ├── requirements.lock.txt
│       ├── requirements.txt
│       └── version.txt
├── models
│   └── customer_segmentation_kmeans
│       ├── latest
│       └── qb6awgeoswnwswyg
│           ├── model.yaml
│           └── saved_model.pkl
├── README.md
└── src
    ├── processors
    │   ├── PCA.pkl
    │   └── scaler.pkl
    └── src
        ├── bentoml_app.py
        └── streamlit_app.py
Pretty cool! We have just created a folder with model, service, processors, Python requirements, and a Dockerfile in a few lines of code!
Deploy to Heroku
Now that you have the built Bentos, you can either containerize it as Docker images or deploy it to Heroku. Since I want to create a public link for my API, I’ll deploy it to the Heroku Container Registry.
Start with installing Heroku, then login to a Heroku account on your command line:
$ heroku login
Login to the Heroku Container Registry:
$ heroku container:login
Create a Heroku app:
$ APP_NAME=bentoml-her0ku-$(date +%s | base64 | tr '[:upper:]' '[:lower:]' | tr -dc _a-z-0-9)heroku create $APP_NAME
Next, go to the docker directory under your latest built Bentos. To view the directories of your Bentos, run:
$ bentoml list -o json
[
  {
    "tag": "customer_segmentation_kmeans:4xidjrepjonwswyg",
    "service": "src.bentoml_app:service",
    "path": "/home/khuyen/bentoml/bentos/customer_segmentation_kmeans/4xidjrepjonwswyg",
    "size": "29.13 KiB",
    "creation_time": "2022-02-16 17:15:01"
  }
]
Since my latest Bentos is in ~/bentoml/bentos/customer_segmentation_kmeans/4xidjrepjonwswyg , I’ll run:
cd ~/bentoml/bentos/customer_segmentation_kmeans/4xidjrepjonwswyg/env/docker
Containerize Bentos and push it to the Heroku app that was created above:
$ heroku container:push web --app $APP_NAME --context-path=../..
Release the app:
$ heroku container:release web --app $APP_NAME
The new app now should be listed in the Heroku dashboard:
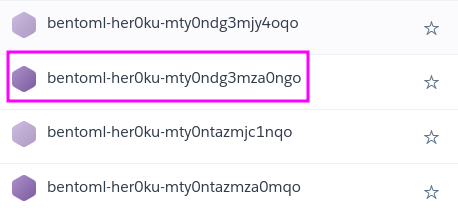
Click the app’s name then click “Open app” to open up the app of your API:
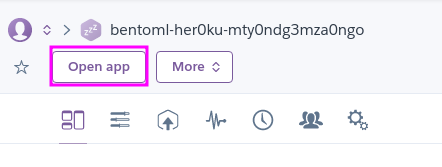
The public link for my API service is https://bentoml-her0ku-mty0ndg3mza0ngo.herokuapp.com.
Now you can use the public link to make prediction requests with sample data:
import requests

prediction = requests.post(
    "https://bentoml-her0ku-mty0ndg3mza0ngo.herokuapp.com/predict",
    headers={"content-type": "application/json"},
    data='{"Income": 58138, "Recency": 58, "NumWebVisitsMonth": 2, "Complain": 0,"age": 64,"total_purchases": 25,"enrollment_years": 10,"family_size": 1}',
).text

print(prediction)
2
That’s it! Now you can send this link to other members of your team so that they can build a machine learning-powered web app. No installation and setup are needed to use your machine learning model. How cool is that?
If you prefer to create a simple UI yourself, the next section will show you how to do that with Streamlit.
Build a UI for Your Service Using Streamlit
If you want your managers or stakeholders to try out your model, it can be a good idea to build a simple UI for your model using Streamlit.
In the file streamlit_app.py, I get the inputs from users then use those inputs to make prediction requests.
import json
import math

import requests
import streamlit as st

st.title("Customer Segmentation Web App")

# ---------------------------------------------------------------------------- #
# Get inputs from user
data = {}

data["Income"] = st.number_input(
    "Income",
    min_value=0,
    step=500,
    value=58138,
    help="Customer's yearly household income",
)
data["Recency"] = st.number_input(
    "Recency",
    min_value=0,
    value=58,
    help="Number of days since customer's last purchase",
)
data["NumWebVisitsMonth"] = st.number_input(
    "NumWebVisitsMonth",
    min_value=0,
    value=7,
    help="Number of visits to company’s website in the last month",
)
data["Complain"] = st.number_input(
    "Complain",
    min_value=0,
    value=7,
    help="1 if the customer complained in the last 2 years, 0 otherwise",
)
data["age"] = st.number_input(
    "age",
    min_value=0,
    value=64,
    help="Customer's age",
)
data["total_purchases"] = st.number_input(
    "total_purchases",
    min_value=0,
    value=25,
    help="Total number of purchases through website, catalogue, or store",
)
data["enrollment_years"] = st.number_input(
    "enrollment_years",
    min_value=0,
    value=10,
    help="Number of years a client has enrolled with a company",
)
data["family_size"] = st.number_input(
    "family_size",
    min_value=0,
    value=1,
    help="Total number of members in a customer's family",
)

# ---------------------------------------------------------------------------- #
# Make prediction
if st.button("Get the cluster of this customer"):
    if not any(math.isnan(v) for v in data.values()):
        data_json = json.dumps(data)

        prediction = requests.post(
            "https://bentoml-her0ku-mty0ndg3mza0ngo.herokuapp.com/predict",
            headers={"content-type": "application/json"},
            data=data_json,
        ).text
        st.write(f"This customer belongs to the cluster {prediction}")
Run the Streamlit app:
$ streamlit run src/streamlit_app.py
then go to http://localhost:8501. You should see a web app like the below:
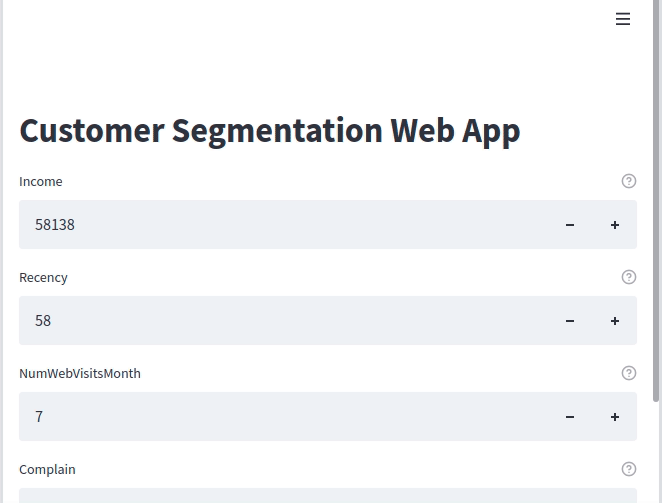
The app is now more intuitive to play with.
Conclusion
You have just learned how to create API endpoints for your machine learning model using BentoML. With BentoML, your teammates can use your model without setting up an environment or messing with your code. How cool is that?
Feel free to play and fork the source code of this article here.