Securing CloudFront
October 3, 2016
By Chris Coffman
Recently, I was developing a website for a company that needed to be globally available. The site also needed to be secured so only employees could access the content. Up to this point I had been hosting my websites in AWS EC2 instances and I wanted to try hosting this site using S3 and CloudFront. I ran into an issue securing the site. We had previously been using a security gateway to provide security to our VPC. If I was going to secure CloudFront, what was the best way to enable security?
The solution suggested by Amazon documentation is to use pre-signed URLs or CloudFront cookies. Cookies are a simple solution when the majority of your website is hosted in CloudFront. They also work best when accessing videos in modern formats such as HLS and MPEG Dash. So, how do you generate the cookies and set in the browser, but only for authenticated users?
The solution I came up with involves taking advantage of the error pages in a CloudFront distribution. In CloudFront you can secure your distribution and provide a custom error page when a user does not have permissions to view a given page. The error page can either take care of authenticating the user or simply redirect to an unsecured login page. The login page is responsible for logging in the user and calling a backend to generate the CloudFront cookies. Once the cookies are generated, the login page can set the cookies and redirect the user back to their original requested content. With the cookies now set, the original content will load. If the user cannot authenticate, the login page is responsible for redirecting to another page explaining that they do not have access or allowing them to sign up.
Solution Diagram

S3 Setup
To implement this solution, I started by setting up an S3 bucket with the following structure:
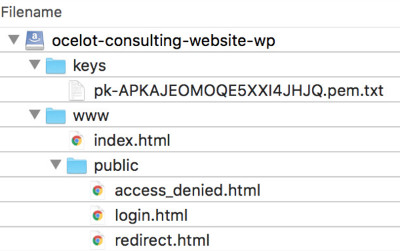
The www folder hosts my website, and the public folder hosts my unsecured HTML pages. The keys folder contains my CloudFront private key file, used to generate cookies to access the content in the www folder.
CloudFront Setup
In CloudFront I created a secure web distribution for my S3 origin, serving content out of the the www folder. I created an additional behavior for the public folder for the purpose of un-securing it.
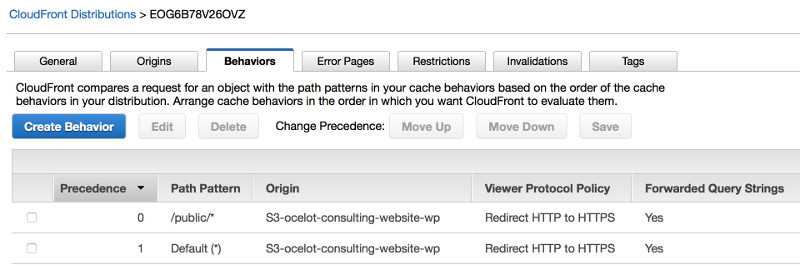
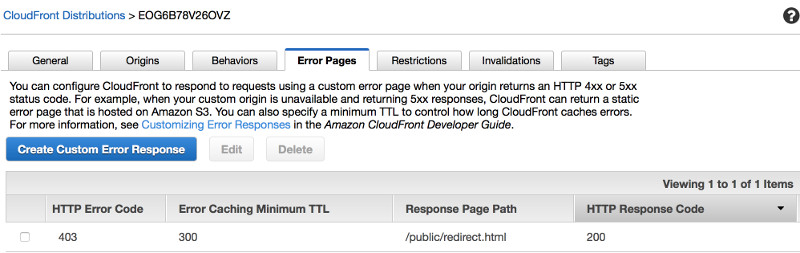
Next, I created an error handler for HTTP 403 errors. Now, instead of giving back a cryptic forbidden response, CloudFront would serve up a webpage that would redirect users to the login page in the public folder.
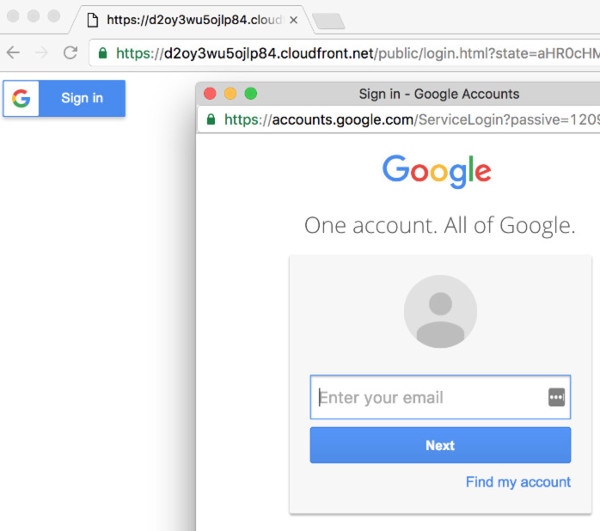
The Login Page
In the login page I provided as an example, users log in with their Google credentials using the vanilla example from Google's documentation.
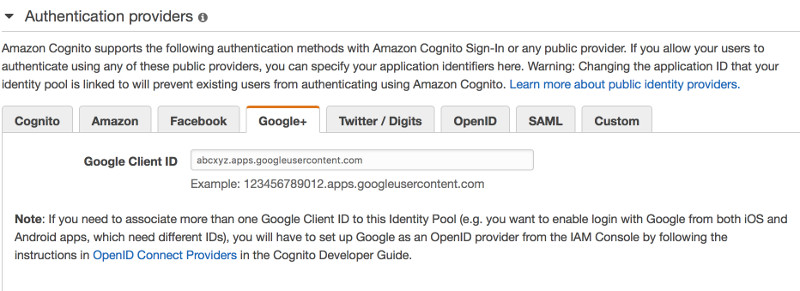
Cognito Integration
Once authenticated, the login page receives an OpenID token for the user. Once obtained, I used AWS Cognito to obtain temporary AWS credentials to directly invoke an AWS Lambda. This is possible because my Cognito federated user pool is integrated with Google+ and anyone in the user pool is allowed to invoke my Lambda.
Lambda
The Lambda calls the Google auth-token API with the user's OpenID token to obtain information about the current user. The code then decides if the user is allowed to view the website based off this information. If so, the CloudFront cookies are generated and sent back to the login page. To generate the cookies our Lambda accesses the private CloudFront key in the /keys directory of our S3 bucket. Using a library makes generating the cookies a breeze.
exports.handler = (event, context, callback) => {
  var tokenInfoUrl = 'https://www.googleapis.com/oauth2/v3/tokeninfo' + events.Logins['accounts.google.com'];

  getJSON(tokenInfoUrl).then(data => {
    if (!data.email.endsWith('@ocelotconsulting.com')) {
      throw new Error('Access denided');
    }
  }).then(() => {
    return getS3('ocelot-consulting-wp', `keys/pk-${keyPairId}.pem.txt`);
  }).then(pk => {
    var options = {
      keypairId: keyPairId,
      privateKeyString: pk.Body.toString(),
      expireTime: moment().add(1, 'day'),
    };
    callback(null, cf.getSignedCookies(`http*://${cloudFrontDomain}/*`, options));
  }).catch(err => {
    console.log('error', err);
    callback(err)
  });
}
After the login page successfully invoked the Lambda using the AWS SDK, it then manually sets the cookies in the browser. The code then validates the redirect location to prevent URL redirection attacks. The login page can then redirect the user back to their originally requested content. With the cookies set the user can view all secured pages in their browser.
There are several really cool advantages to taking this approach. We are not hosting any servers, so we never have to maintain or scale them. We are using federated identity built into AWS, which can integrate with a lot more than just Google. That means we can easily let users log in or sign up with their various personal accounts, without the overhead of maintaining an identity store. And finally, we are taking advantage of CloudFront, which makes our website load quickly by caching our content in edge locations around the globe.
So feel free to contact me with any questions. Look over the code in the github repo and try it yourself. With some small adjustments this can be working to secure your web application in no time at all.
About the code
I put together a project called s3nator that showcases this solution. The project contains a public folder which corresponds to your S3 /www/public folder. The login.html page does have references to an identity pool and Lambda ARN. You will need to change these to match the ones in your AWS account. It also checks the redirect URI, so make sure to update that. The Lambda code lives in lambda.js. Update the file to include the name of your private key name. The private key refers to a CloudFront private key that you drop into the /keys folder in your S3 directory. The If you install the project, the folder can be zipped and uploaded to your AWS Lambda. Name the handler lambda.handler since the file is named lambda.